Sign In
Upload
Manuals
Brands
IBM Manuals
Adapter
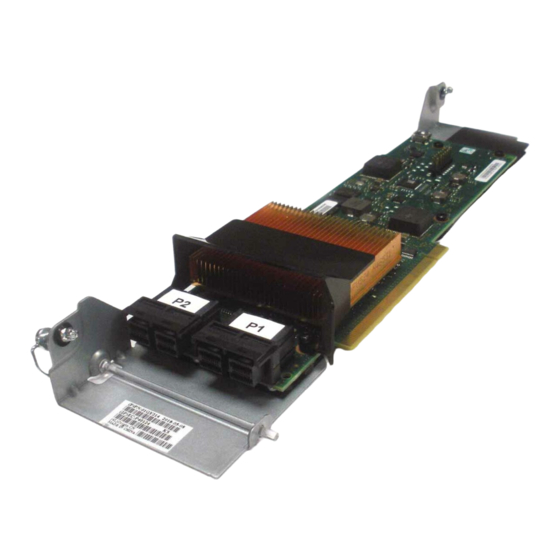
PCIe3 x8 SAS RAID internal adapter 6 Gb
IBM PCIe3 x8 SAS RAID internal adapter 6 Gb Manuals
Manuals and User Guides for IBM PCIe3 x8 SAS RAID internal adapter 6 Gb. We have
1
IBM PCIe3 x8 SAS RAID internal adapter 6 Gb manual available for free PDF download: Manual
IBM PCIe3 x8 SAS RAID internal adapter 6 Gb Manual (130 pages)
Brand:
IBM
| Category:
Adapter
| Size: 19.5 MB
Table of Contents
Table of Contents
5
Safety Notices
9
Pcie3 X8 SAS RAID Internal Adapter 6 Gb for the 5148-21L, 5148-22L, 8247-21L, 8247-22L, 8284-21A, or 8284-22A
19
Installing the Pcie3 X8 SAS RAID Internal Adapter 6 Gb in the 5148-21L, 5148-22L, 8247-21L, 8247-22L, 8284-21A, or 8284-22A
19
Preparing the System to Install a Pcie3 X8 SAS RAID Internal Adapter 6 Gb
19
Installing the Pcie3 X8 SAS RAID Internal Adapter 6 Gb in the 5148-21L, 5148-22L, 8247-21L, 8247-22L, 8284-21A, or 8284-22A
20
Preparing the System for Operation after Installing a Pcie3 X8 SAS RAID Internal Adapter 6 Gb
26
Removing and Replacing the Pcie3 X8 SAS RAID Internal Adapter 6 Gb in the 5148-21L, 5148-22L, 8247-21L, 8247-22L, 8284-21A, or 8284-22A
26
Preparing the System to Remove and Replace the Pcie3 X8 SAS RAID Internal Adapter 6 Gb
26
Removing the Pcie3 X8 SAS RAID Internal Adapter 6 Gb from the 5148-21L, 5148-22L, 8247-21L, 8247-22L, 8284-21A, or 8284-22A
30
Replacing the Pcie3 X8 SAS RAID Internal Adapter 6 Gb in the 5148-21L, 5148-22L, 8247-21L, 8247-22L, 8284-21A, or 8284-22A
32
Preparing the System for Operation after Removing and Replacing the Pcie3 X8 SAS RAID Internal Adapter 6 Gb
35
Common Procedures for Removing or Replacing the Pcie3 X8 SAS RAID Internal Adapter 6 Gb
37
Before You Begin
37
Identifying a Part
40
Identifying the Enclosure or Server that Contains the Part
40
Control Panel Leds
40
Enabling Enclosure or Server Indicators with the ASMI
40
Activating an Identify LED for an Enclosure or Server by Using the HMC
41
Finding the Part Location Code and LED Support Status
42
Identifying a Part by Using the Operating System or VIOS
43
Activating the Indicator Light for a Part by Using AIX Diagnostics
43
Finding the Location Code for a Part in an AIX System or Logical Partition
43
Identifying a Part in an AIX System or Logical Partition
43
Finding the Location Code and Activating the Indicator Light for a Part by Using the IBM I Operating System
44
Identifying a Part in an IBM I System or Logical Partition
44
Activating the Indicator Light for a Part by Using the Linux Operating System
45
Finding the Location Code of a Part in a Linux System or Logical Partition
45
Finding the Location Code of a Part in a VIOS System or Logical Partition
45
Identifying a Part in a Linux System or Logical Partition
45
Identifying a Part in a VIOS System or Logical Partition
45
Activating the Indicator Light for a Part by Using the VIOS Tools
46
Identifying a Part by Using the ASMI
46
Activating the Identify LED by Using the ASMI When You Know the Location Code
46
Activating the Identify LED by Using the ASMI When You Do Not Know the Location Code
47
Identifying a Part by Using the HMC
47
Starting the System or Logical Partition
48
Starting a System that Is Not Managed by an HMC
48
Starting a System by Using the Control Panel
48
Starting a System by Using the ASMI
50
Starting a System or Logical Partition by Using the HMC
50
Starting a System or Logical Partition by Using the HMC Classic or HMC Enhanced Interface
50
Starting a System or Logical Partition by Using the HMC Enhanced + Tech Preview (Pre-GA) or HMC Enhanced+ Interface
50
Starting an IBM Powerkvm System
51
Stopping a System or Logical Partition
51
Stopping a System that Is Not Managed by an HMC
51
Stopping a System by Using the ASMI
52
Stopping a System by Using the Control Panel
52
Stopping a System by Using the HMC
52
Stopping a System by Using the HMC Classic or HMC Enhanced Interface
53
Stopping a System by Using the HMC Enhanced + Tech Preview (Pre-GA) or HMC Enhanced+ Interface
53
Stopping an IBM Powerkvm System
53
Removing and Replacing Covers on the 5148-21L, 5148-22L, 8247-21L, 8247-22L, 8247-42L, 8284-21A, 8284-22A, 8286-41A, or 8286-42A System
54
Removing the Front Cover
54
Removing the Front Cover from a Rack-Mounted 5148-21L, 5148-22L, 8247-21L, 8247-22L, 8284-21A, or 8284-22A System
54
Removing the Front Cover from a Rack-Mounted 8247-42L, 8286-41A, or 8286-42A System
55
Removing the Front Cover from a Stand-Alone 8286-41A System
56
Removing the Side Cover from a Stand-Alone 8286-41A System with an Internal RDX Docking Station
57
Installing the Front Cover
60
Installing the Front Cover on a Rack-Mounted 5148-21L, 5148-22L, 8247-21L, 8247-22L, 8284-21A, or 8284-22A System
60
Installing the Front Cover on a Rack-Mounted 8247-42L, 8286-41A, or 8286-42A System
61
Installing the Front Cover and Front Door on a Stand-Alone 8286-41A System
62
Installing the Side Cover on a Stand-Alone 8286-41A System with an Internal RDX Docking Station
63
Removing the Service Access Cover from a 5148-21L, 5148-22L, 8247-21L, 8247-22L, 8247-42L, 8284-21A, 8284-22A, 8286-41A, or 8286-42A System
66
Removing the Service Access Cover from a Rack-Mounted 5148-21L, 5148-22L, 8247-21L, 8247-22L, 8247-42L, 8284-21A, 8284-22A, 8286-41A, or 8286-42A System
66
Removing the Service Access Cover from a Stand-Alone 8286-41A System
67
Installing the Service Access Cover on a 5148-21L, 5148-22L, 8247-21L, 8247-22L, 8247-42L, 8284-21A, 8284-22A, 8286-41A, or 8286-42A System
68
Installing the Service Access Cover on a Rack-Mounted 5148-21L, 5148-22L, 8247-21L, 8247-22L, 8247-42L, 8284-21A, 8284-22A, 8286-41A, or 8286-42A System
68
Installing the Service Access Cover on a Stand-Alone 8286-41A System
69
Air Baffle
70
Opening the Air Baffle on an 8247-42L, 8286-41A, or 8286-42A System
70
Closing the Air Baffle on an 8247-42L, 8286-41A, or 8286-42A System
71
Removing the Air Baffle from an 8247-42L, 8286-41A, or 8286-42A System
72
Replacing the Air Baffle on an 8247-42L, 8286-41A, or 8286-42A System
73
Service and Operating Positions for the 5148-21L, 5148-22L, 8247-21L, 8247-22L, 8247-42L, 8284-21A, 8284-22A, 8286-41A, or 8286-42A System
74
Placing the Rack-Mounted System into the Service Position
74
Placing the Rack-Mounted System into the Operating Position
76
Power Cords
76
Disconnecting the Power Cords from the System
76
Connecting the Power Cords to the System
79
Installing or Replacing a Part with an HMC
82
Installing a Part by Using the HMC
82
Removing a Part by Using the HMC
82
Repairing a Part by Using the HMC
83
Verifying the Installed Part
84
Verifying a Part by Using the Operating System or VIOS
84
Verifying an Installed Feature by Using the AIX Operating System
84
Verifying an Installed Feature or Replaced Part by Using an AIX System or Logical Partition
84
Verifying a Replaced Part by Using the AIX Operating System
85
Verifying an Installed Part by Using a Linux System or Logical Partition
87
Verifying an Installed Part by Using Stand-Alone Diagnostics
87
Verifying the Installed Part by Using an IBM I System or Logical Partition
87
Verify the Replacement Part by Using VIOS
89
Verifying an Installed Part by Using VIOS
89
Verifying an Installed Part or Replaced Part on a System or Logical Partition by Using Virtual I/O Server Tools
89
Verifying the Installed Part by Using the HMC
91
Viewing Serviceable Events by Using the HMC
92
Verifying a Repair
92
Verifying the Repair in AIX
93
Verifying a Repair by Using an IBM I System or Logical Partition
96
Verifying the Repair in Linux
98
Verifying the Repair on an IBM Powerkvm System
98
Verifying the Repair from the Management Console
99
Closing a Service Call
100
Closing a Service Call by Using AIX or Linux
103
Closing a Service Call by Using IBM Powerkvm
106
Closing a Service Call by Using Integrated Virtualization Manager
107
Activating and Deactivating Leds
109
Deactivating a System Attention LED or Partition LED by Using the Management Console
110
Activating or Deactivating an Identify LED by Using the Management Console
111
Deactivating a System Attention LED or Logical Partition LED by Using the Advanced System Management Interface
112
Activating or Deactivating an Identify LED by Using the Advanced System Management Interface
112
Deactivating an Identify LED
113
Deactivating a System Attention LED by Using the Operating System or VIOS Tools
113
Deactivating the Indicator Light for a Part by Using AIX Diagnostics
113
Deactivating the Indicator Light by Using the IBM I Operating System
113
Deactivating the Indicator Light by Using the Linux Operating System
114
Deactivating the Indicator Light for a Part by Using the VIOS Tools
114
Deactivating a System Attention LED by Using the ASMI
114
Deactivating a Check Log Indicator (System Information Indicator) by Using the ASMI
115
Deactivating the Identify LED by Using the ASMI When You Do Not Know the Location Code
115
Deactivating the Identify LED by Using the ASMI When You Know the Location Code
115
Deactivating Leds by Using the HMC
116
Deactivating a System Attention LED or Partition LED by Using the HMC
116
Deactivating an Identify LED for a FRU by Using the HMC
117
Deactivating an Identify LED for an Enclosure by Using the HMC
117
Notices
119
Privacy Policy Considerations
120
Trademarks
121
Electronic Emission Notices
121
Class a Notices
121
Class B Notices
125
Terms and Conditions
128
Advertisement
Advertisement
Related Products
IBM USB Serial Parallel Adapter
IBM Dual Port 10/100/1000 Base-TX PCI-X Adapter
IBM Power System PCIe3
IBM PCI SCSI-2 Fast/Wide Single-Ended Adapter
IBM PCI Audio Adapter
IBM PC 300PL Types 6862
IBM PC 300PL Type 6565
IBM PC 300PL Type 6594
IBM PC 300PL Type 6892
IBM PC 300PL Type 6592
IBM Categories
Server
Desktop
Storage
Laptop
Monitor
More IBM Manuals
Login
Sign In
OR
Sign in with Facebook
Sign in with Google
Upload manual
Upload from disk
Upload from URL